
Radius Introduction
The BQN can be configured to receive RADIUS messages to support the following functionality:
- Assignment of rate policies to subscribers.
- Dynamic definition of those rate policies.
- Management of time and/or volume quotas.
- Assignment of a RADIUS attribute to BQN subscriber ID.
- Assignment of a RADIUS attribute to BQN subscriber group.
The enforcement of quotas and rate policies is applied per subscriber IP address, so the BQN must have visibility of the subscriber IP addresses, i.e., there cannot be a NAT between the subscribers and the BQN because the rate limits will be applied per subscriber IP address. It is also important that the wires are connected in the right way (access ports connected on the side of the subscribers).
There are two ways for BQN to receive RADIUS messages:
- As a RADIUS accounting server.
- As a RADIUS proxy between RADIUS clients and the RADIUS server (both for Authentication and Accounting RADIUS).
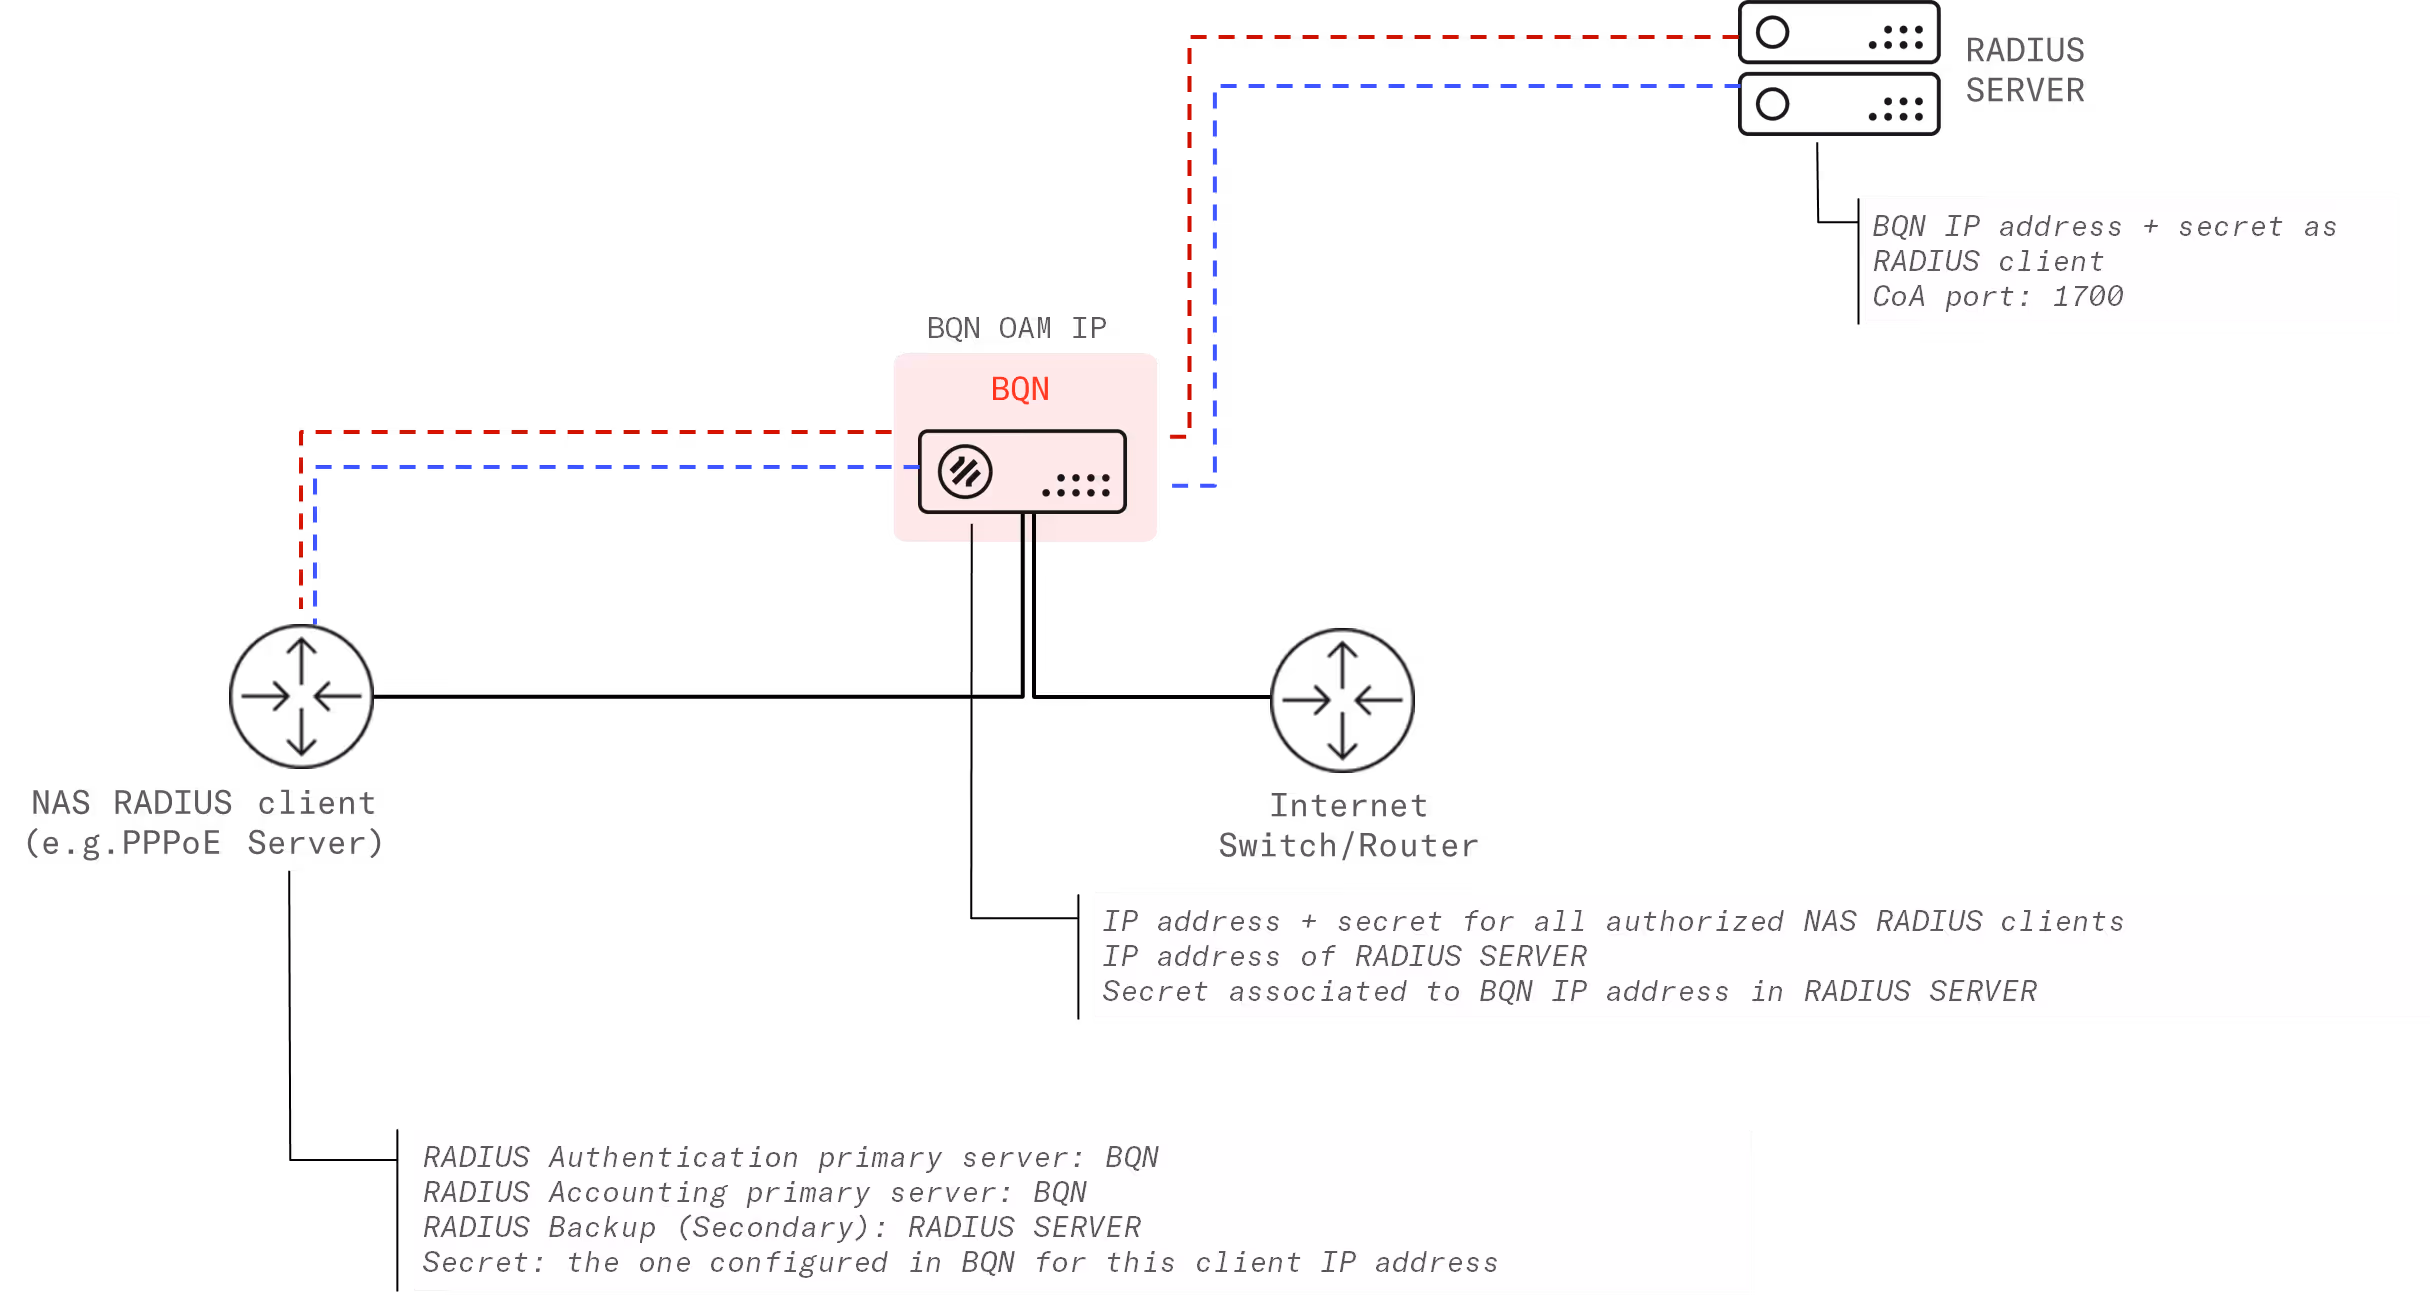
The following diagram summarizes a BQN deployment as a RADIUS accounting server:
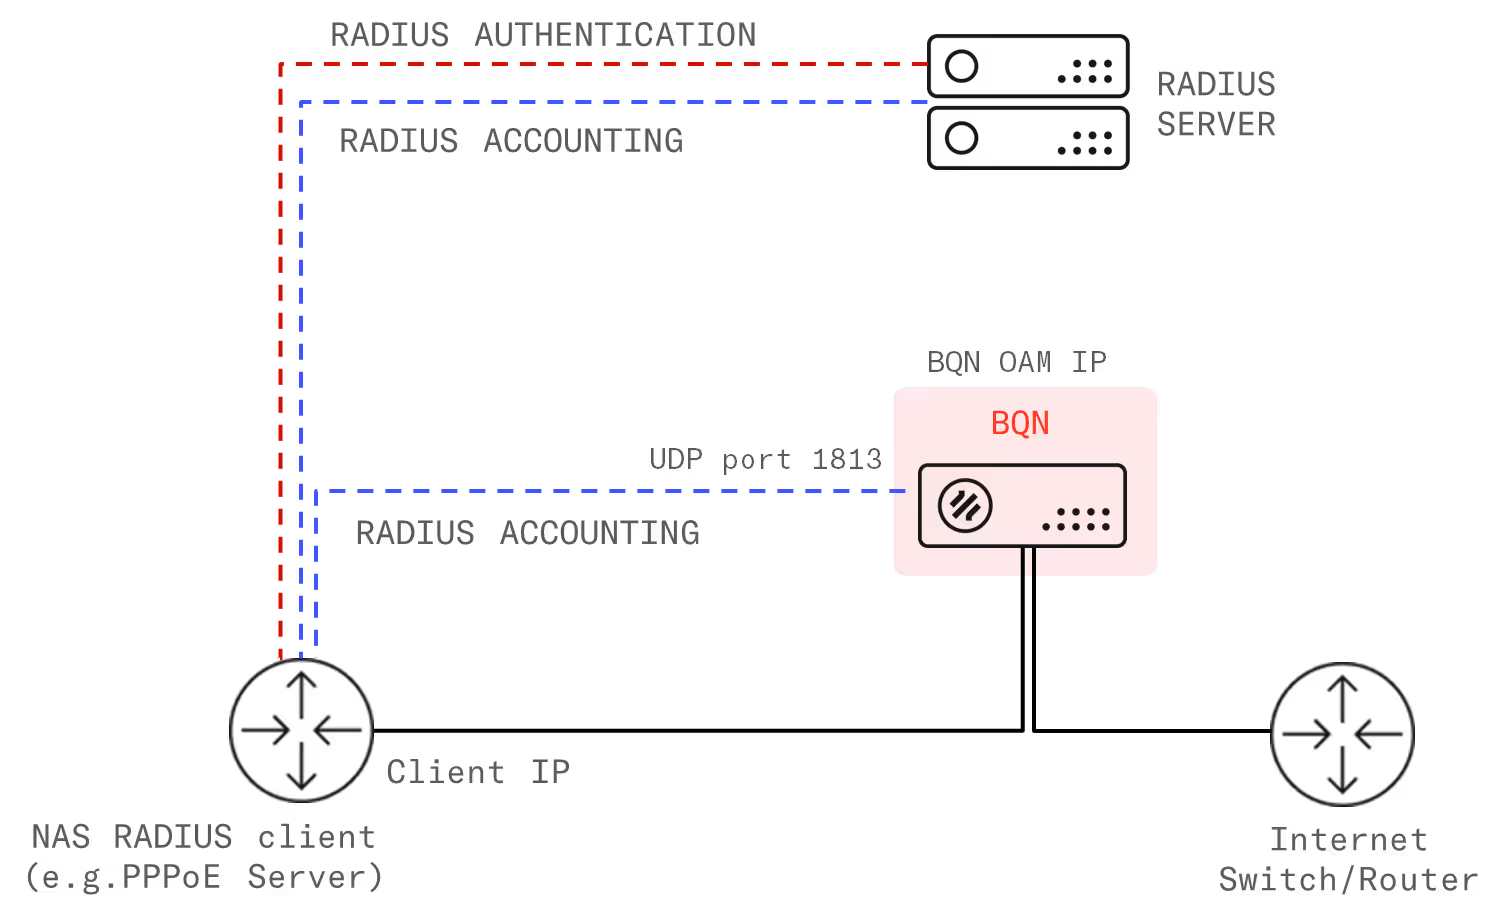
The diagram details the IP and ports used and the flow of the RADIUS signaling.
Similarly, for a BQN deployment as a RADIUS proxy:

The BQN uses its management IP address (same address as GUI) to receive and send RADIUS messages. It uses the following ports:
- UDP port 1812 for RADIUS Authentication/Authorization
- UDP port 1813 for RADIUS accounting
- UDP port to receive Change of Authorization Disconnect message (1700 by default, though others like 3799 port can be configured).
RADIUS accounting server and RADIUS proxy deployments have pros and cons. The main advantage of RADIUS accounting deployment is that the BQN is not in the RADIUS authentication path.
<div class="paragraph-highlight">RADIUS accounting server deployment is the preferred option.</div>
However, Quota management requires a RADIUS proxy deployment. Also, RADIUS proxy deployment is a valid option when RADIUS accounting server is not possible (for example, with Mikrotik routers in DHCP mode).
Accounting Server Deployment
To integrate the BQN to the RADIUS in Accounting server mode, it is necessary to make configuration changes in the BQN and in the NAS RADIUS clients. The following picture shows a summary:
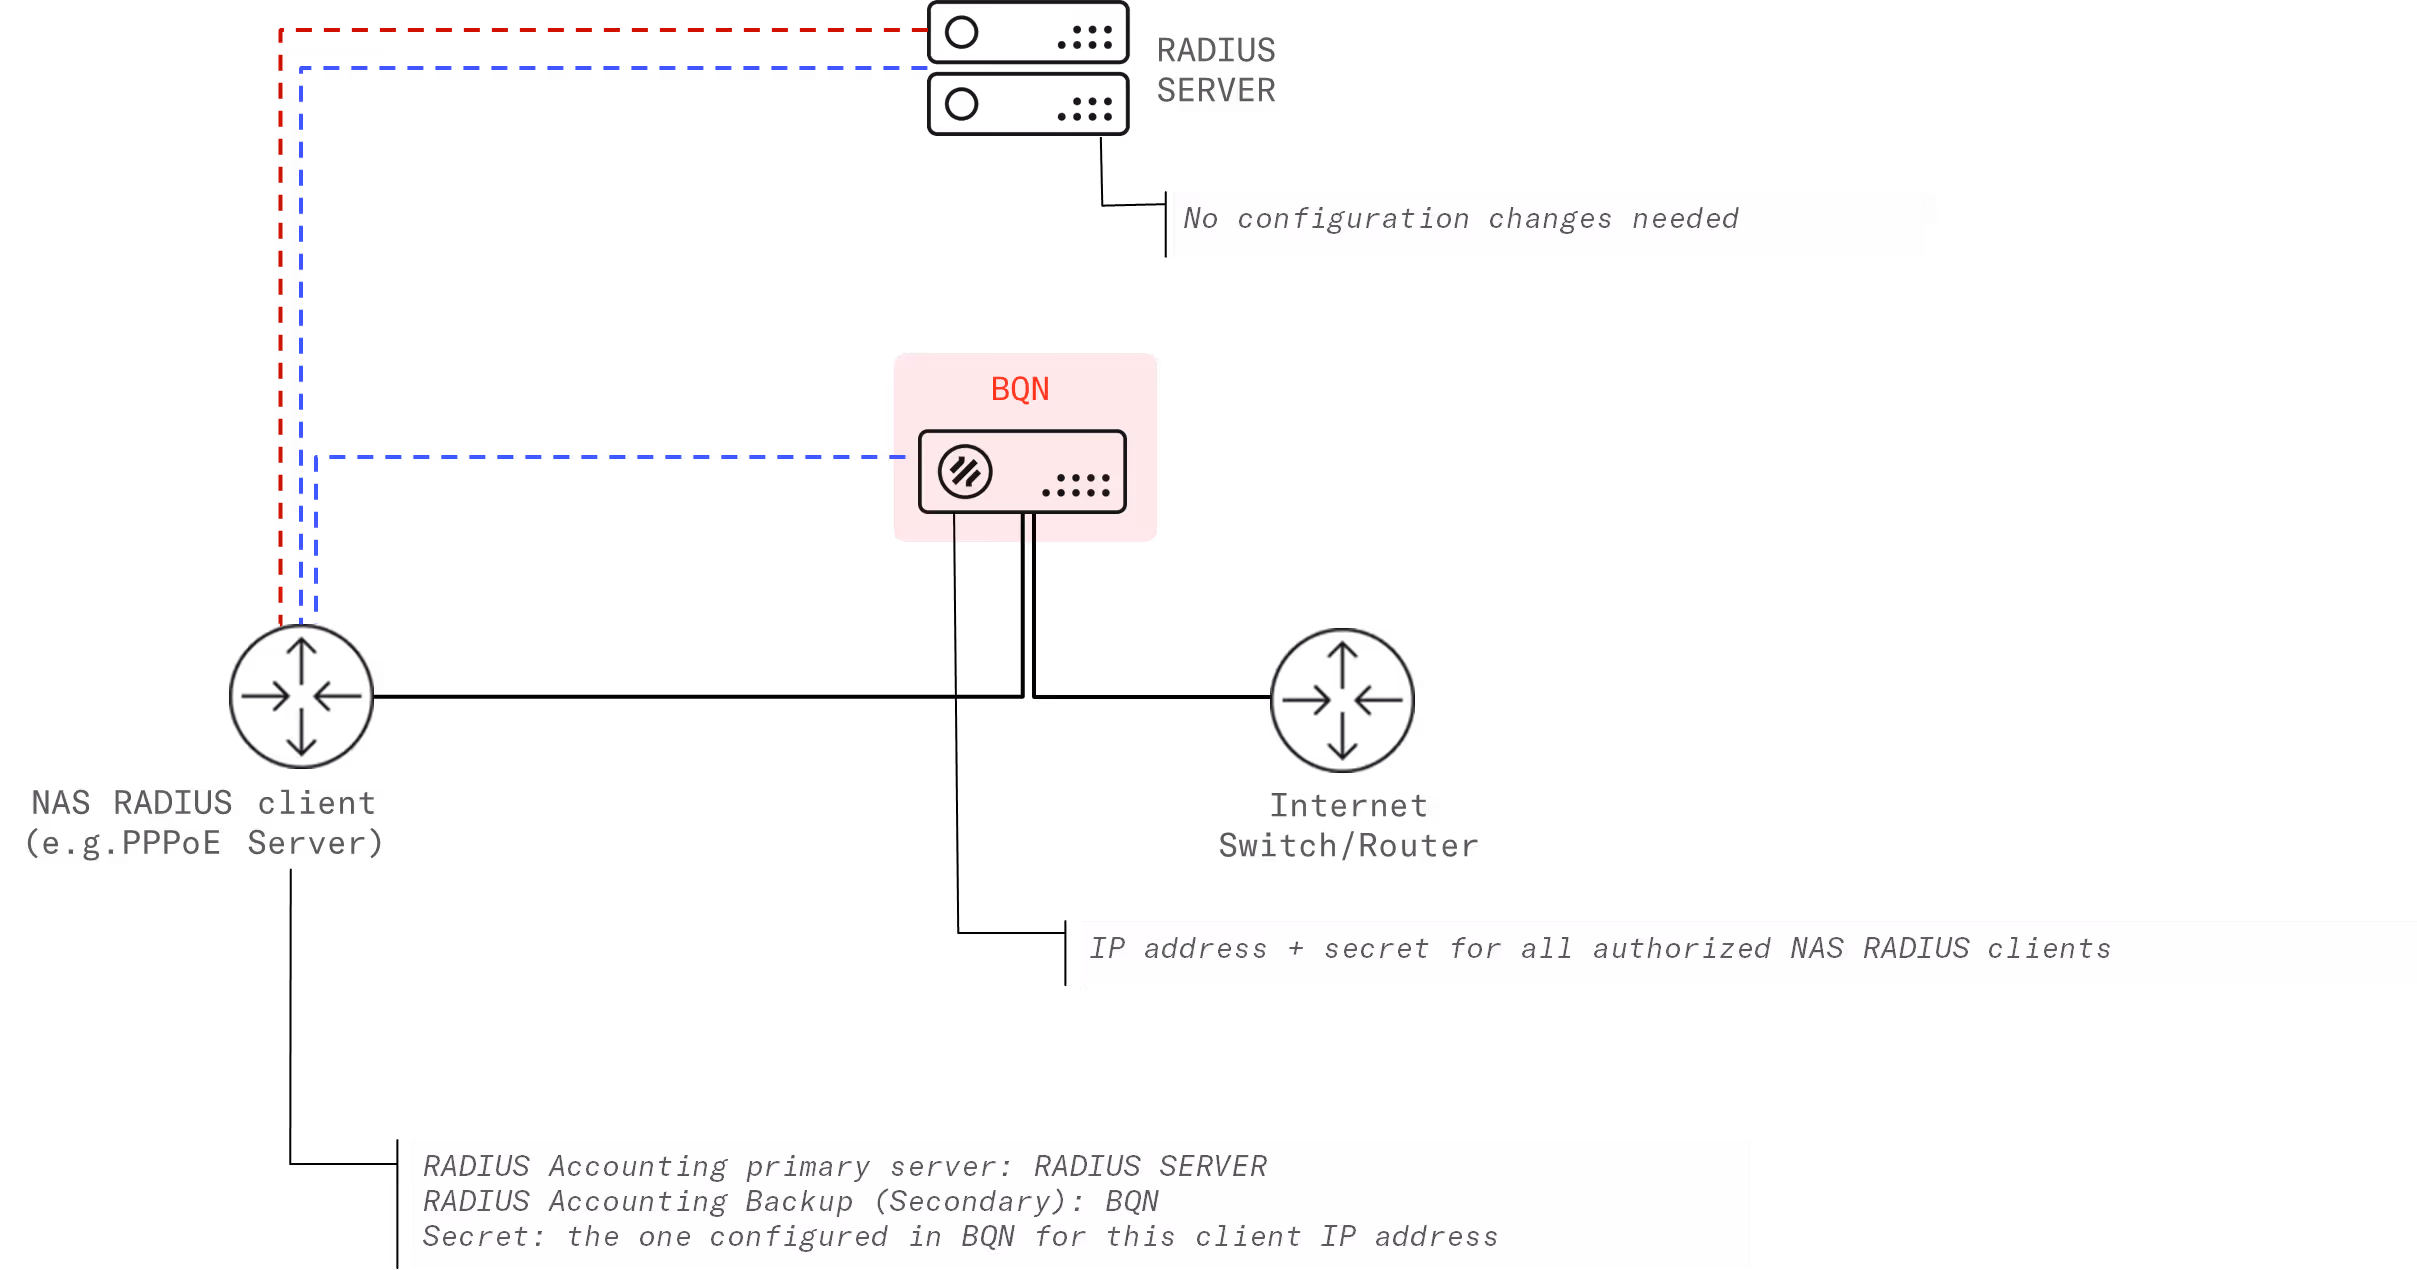
The BQN will receive RADIUS Accounting messages: Accounting-Start, Accounting-Interim and Accounting-Stop.
Configuration of the BQN
Follow these steps:
- Go to Configuration->RADIUS/REST/Billing->RADIUS
- Set the RADIUS service switch to On.
- Select Accounting server option in RADIUSproxy/Accounting server field.
- Add the IP addresses of each NAS RADIUS client, along with its secret. To do so, in the BQN GUI, go to Configuration->RADIUS/REST/Billing->RADIUS and click on Add Client…
The next screenshot shows an example:
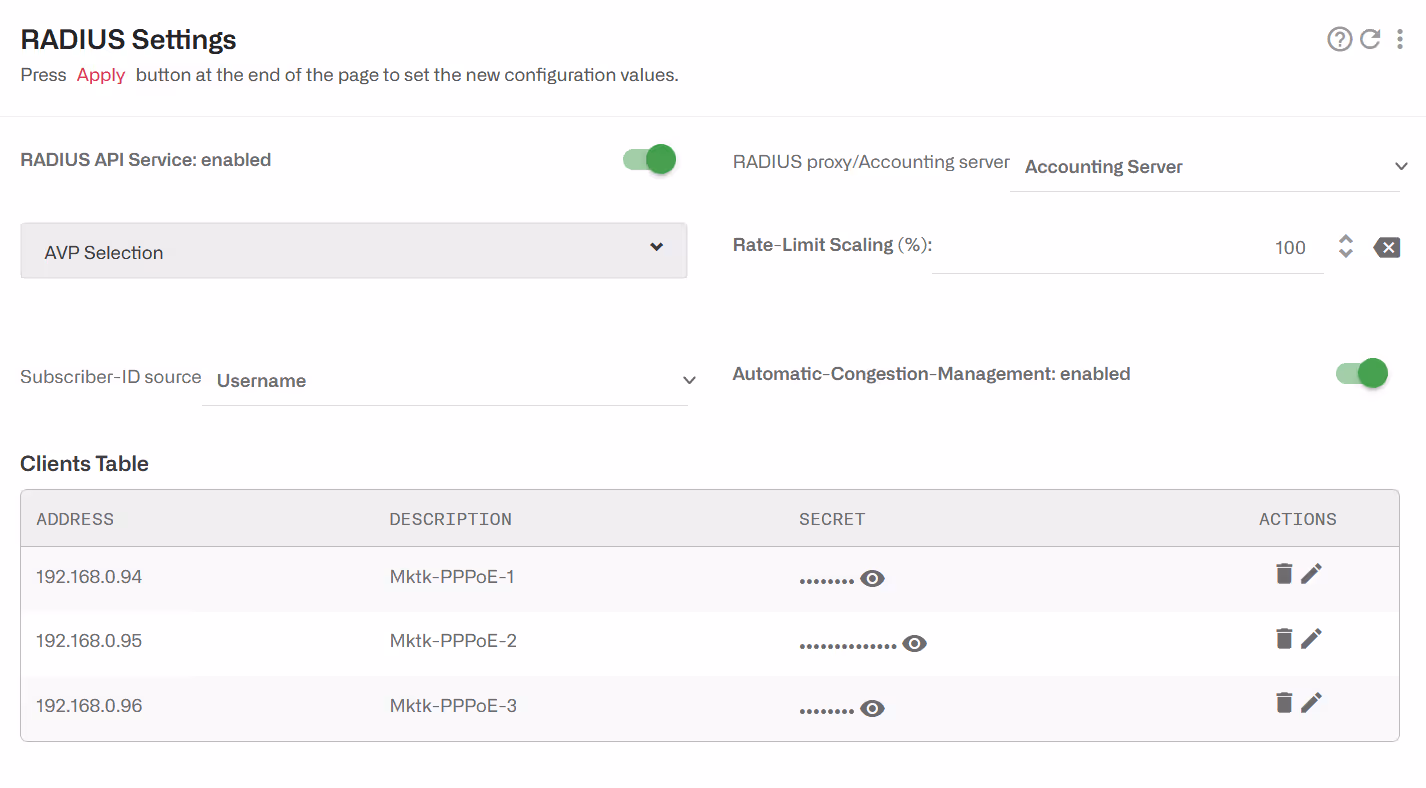
An optional description for each NAS RADIUS client can be added (the description cannot contain spaces).
Configuration of the NAS RADIUS clients
The goal is to configure the NAS RADIUS client to send copies of RADIUS accounting messages to the BQN, as if the BQN server is a RADIUS server only for accounting. The steps for each NAS RADIUS client are:
- Configure a RADIUS backup server with BQN IP address and the secret configured previously in BQN for this NAS.
- Make sure the port used is UDP 1813.
- Set Accounting Interim Updates, with an interim period no longer than 5 minutes.
The following instructions are related to a Mikrotik PPPoE server, but similar steps can be followed for other vendors:
- First, the existing RADIUS configuration should not be changed
- A new RADIUS server will be configured with the BQN as an Accounting Backup server. To create a new RADIUS server, go to the RADIUS section and click on “Add New”. The following screen will be shown:
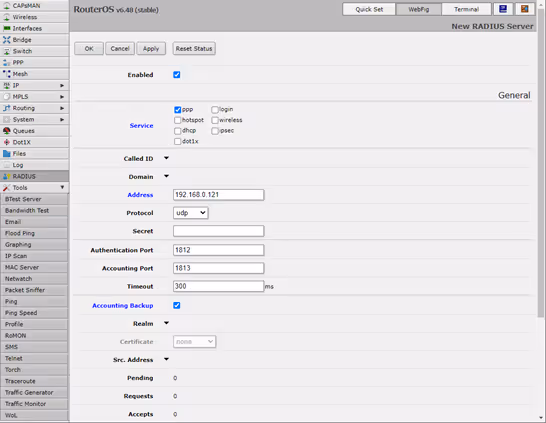
As it can be observed:
- The service of the router/switch should be enabled (usually ppp).
- In “Address” the IP address will be the BQN management IP address (you can see which one it is in BQN GUI Configuration->Interfaces->Management).
- The field Accounting Backup must be selected (otherwise, the BQN would receive RADIUS Authentication and Authorization messages, which it does not support).
- The accounting port is left in its default value(1813).
- Optionally, a secret can be specified (if used, it must match the one configured in the BQN RADIUS configuration).
- Optionally, a Comment can add a description of the RADIUS server (e.g., “BQN RADIUS”).
After creating the RADIUS server, the list should be as follows:
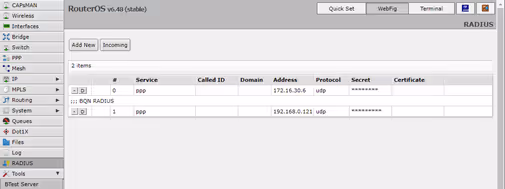
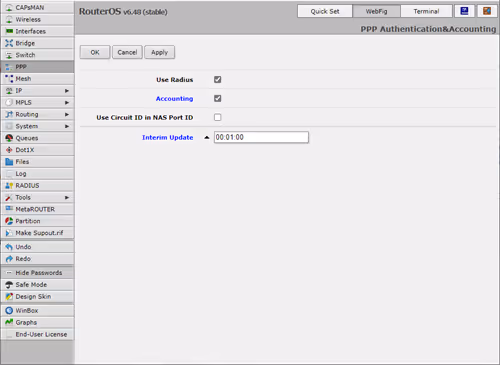
Make sure the service has RADIUS Interim Updates enabled and with a reasonable period (1-5 minutes). For example, for PPP, in option PPP->Secrets->PPP Authentication & Accounting.
The process must be repeated in all the nodes whose RADIUS is to be sent to the BQN.
Proxy Deployment
To integrate the BQN to the RADIUS in proxy mode, it is necessary to make configuration changes in the BQN, the NAS RADIUS clients and the RADIUS Server. The following picture shows a summary:
The BQN will receive:
- RADIUS Authentication messages: Access-Request, Access-Accept, Access-Reject, Access-Challenge.
- RADIUS Accounting messages: Accounting-Start, Accounting-Interim and Accounting-Stop.
- RADIUS Disconnect message
- RADIUS CoA Requests: the BQN will perform a purerelay of the CoA requests and responses. Any change in session attributes done bythe CoA request message will take effect in the BQN only if the change is reflectedin the next Accounting message received by the BQN.
Configuration of the BQN
Follow these steps:
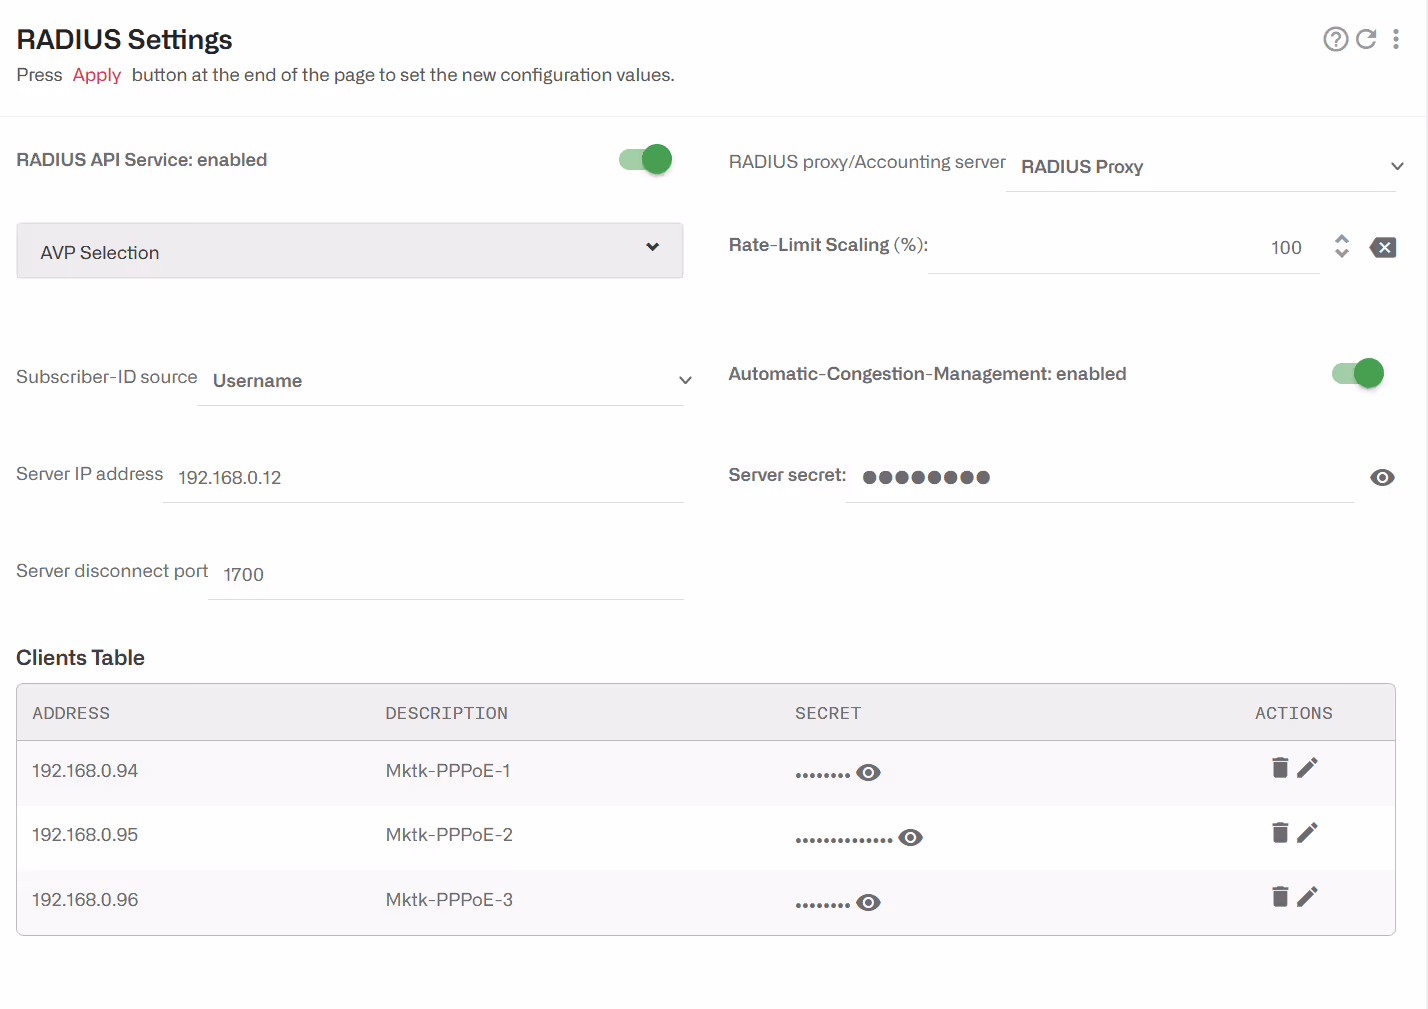
- Go to Configuration->RADIUS/REST/Billing->RADIUS
- Set the RADIUS service switch to On.
- Select RADIUS proxy option in RADIUS proxy/Accounting server field.
- Configure the RADIUS server IP address and secret in fields Server IP address and Server secret respectively.
- Add the IP addresses of each NAS RADIUS client, along with its secret. To do so, in the BQN GUI, go to Configuration->RADIUS/REST/Billing->RADIUS and click on Add Client…
- Configure the Disconnect port used by the RADIUS server (1700 by default).
The next screenshot shows an example:
Configuration of the NAS RADIUS clients
The steps for each NAS RADIUS client are:
- Configure the BQN IP address as primary RADIUS server, using the secret configured previously in the BQN.
- Make sure the ports used are UDP 1812 for authentication, UDP 1813 for accounting and UDP 1700 to receive Disconnects or CoAs.
- Set the RADIUS server as backup RADIUS, if possible.
Configuration of the RADIUS server
Follow these steps:
- Configure the BQN IP address as a valid NAS RADIUS client, with a secret equal to the one previously configured in the BQN.
RADIUS AVP handling
The BQN processes some RADIUS AVPs (Attribute-Value Pairs) to implement BQN own functionality, such as rate policy enforcement, quotas or information for subscriber identification.
By default, the BQN reacts to all the supported AVPs (of which more later on in this chapter), but it is configurable to ignore some of them. When in proxy deployment mode, the BQN will relay ignored AVPs but still will not perform any other action. One possible reason to ignore AVPs is when others with lower priority are preferred. The policy rate section provides a concrete example.
When in proxy BQN deployment mode, the BQN can also remove some AVPs received in an Accept-Accept message from the RADIUS server before relaying it to the NAS RADIUS client. One possible reason to remove AVPs is to prevent the NAS client to try to act on them, interfering with BQN actions. The quota section provides a concrete example.
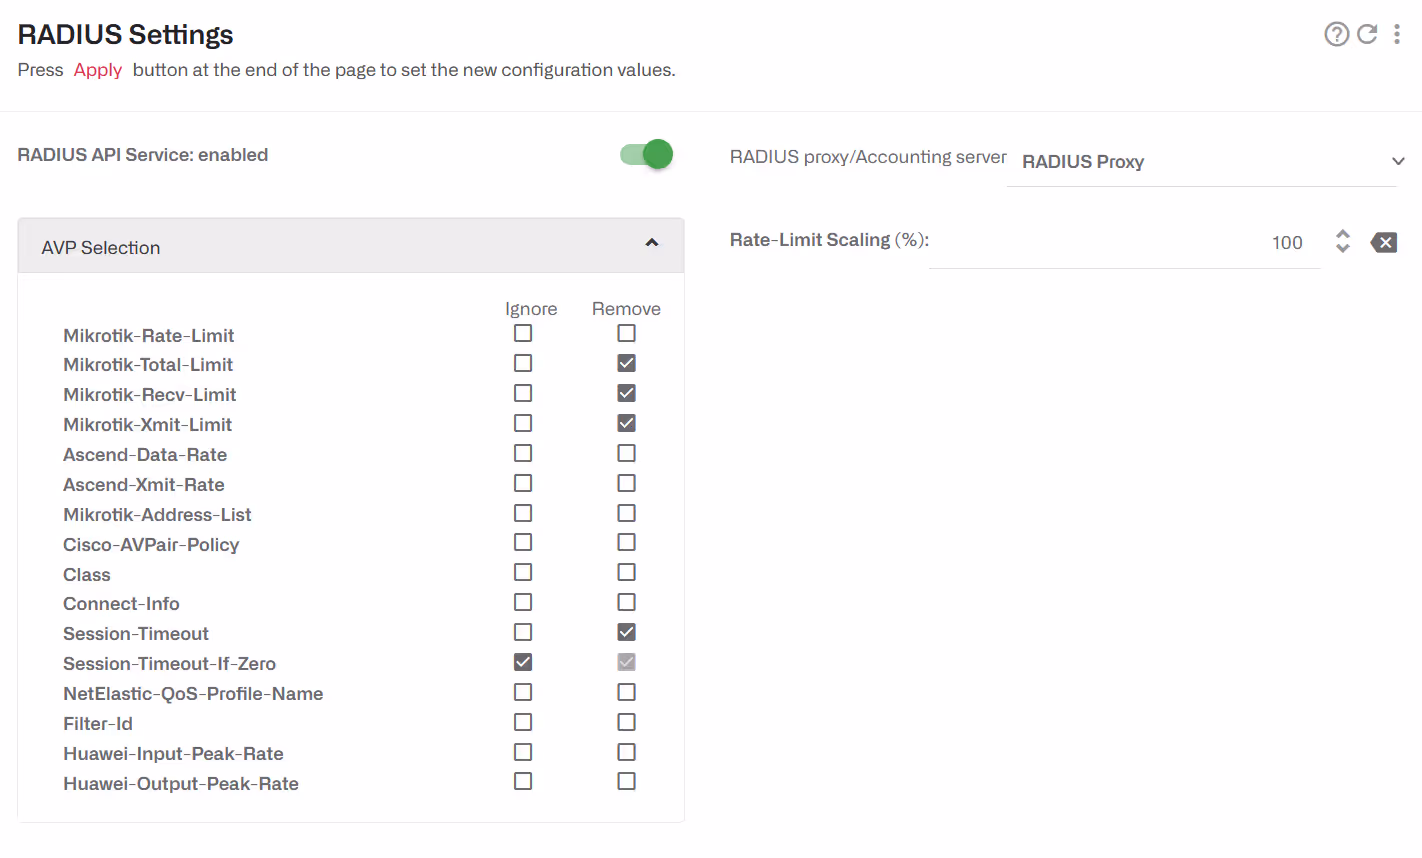
The configuration of AVP handling is in Configuration->RADIUS/REST/Billing->RADIUS, under AVP Selection field.
Rate Policy Control
The RADIUS Accounting Start and Interim messages link a subscriber IP address with a subscriber rate policy. The subscriber IP address is received in the Framed-IP-Address field. There are two ways to specify the subscriber rate policy:
- Specifying the subscriber rate policy parameters (like the rate limit), where the RADIUS attribute provides the policy definition and the BQN creates a policy based on that information.
- Specifying the subscriber rate policy name, where the RADIUS attribute contains the name of the policy to choose from the policies that are part of the BQN configuration.
Both accounting server and proxy deployments can be used for rate policy control.
Supported RADIUS AVPs for Rate Policies
The following RADIUS AVPs are supported for rate policy management. We list them in order of priority (parameters evaluated first will take precedence):
When more than one AVP is present, the policy will be managed according to the priority order. For example, if both Mikrotik-Rate-Limit and Ascend-Data-Rate are present, Mikrotik-Rate-Limit will take precedence. Also, if both Ascend-Data-Rate and Mikrotik-Address-List are in the Radius message, Mikrotik-Address-List will be ignored. In any case, it is possible to use any of those information elements, since the BQN can be configured to ignore the ones with more precedence, as can be seen in the following section.
If a RADIUS message contains none of the supported AVPs, the subscriber rate policy previously assigned to the subscriber IP address in this RADIUS message, if any, will be removed and a new one will be chosen based on BQN configured subscriber rate policy rules.
RADIUS Provides the Rate Policy Definition
This requires basically no specific configuration. Just make sure that in Configuration-> RADIUS/REST/Billing->RADIUS, the RADIUS parameters which will specify the policy are not ignored (they are not ignored by default). Once the BQN starts receiving the RADIUS messages, it will assign each subscriber (for which a RADIUS message is received) a subscriber rate policy with the rate limits defined in the RADIUS message.

The name of the policy created dynamically is composed based on the AVP content, with the following format:
where:
- RA-: a prefix indicating that it is a policy created from RADIUS.
- rx-rate: rate limit in uplink.
- tx-rate: rate limit in downlink.
- rx-burst-rate: burst rate in uplink.
- tx-burst-rate: burst rate in downlink.
- rx-burst-threshold: burst threshold in uplink (average speed not to be exceeded before granting a new burst).
- tx-burst-threshold: burst threshold in downlink (average speed not to be exceeded before granting a new burst).
- rx-burst-time: uplink burst duration, in seconds.
- tx-burst-time downlink burst duration, in seconds.
Rates and thresholds will include their units (K for Kbps, Mfor Mbps and G for Gbps).
Once the BQN has the rate policies, it will enforce them on a subscriber IP address basis. Regarding the enforcement in the NAS (e.g. the PPPoE server), there are three options:
- Remove the rate limits in the NAS (e.g. remove Mikrotik queues).
- Make the BQN apply the policy limits reduced by a configurable factor, so BQN will be the enforcement point, not the NAS. The NAS remains a backup at the full rate limit, should BQN enforcement fails.
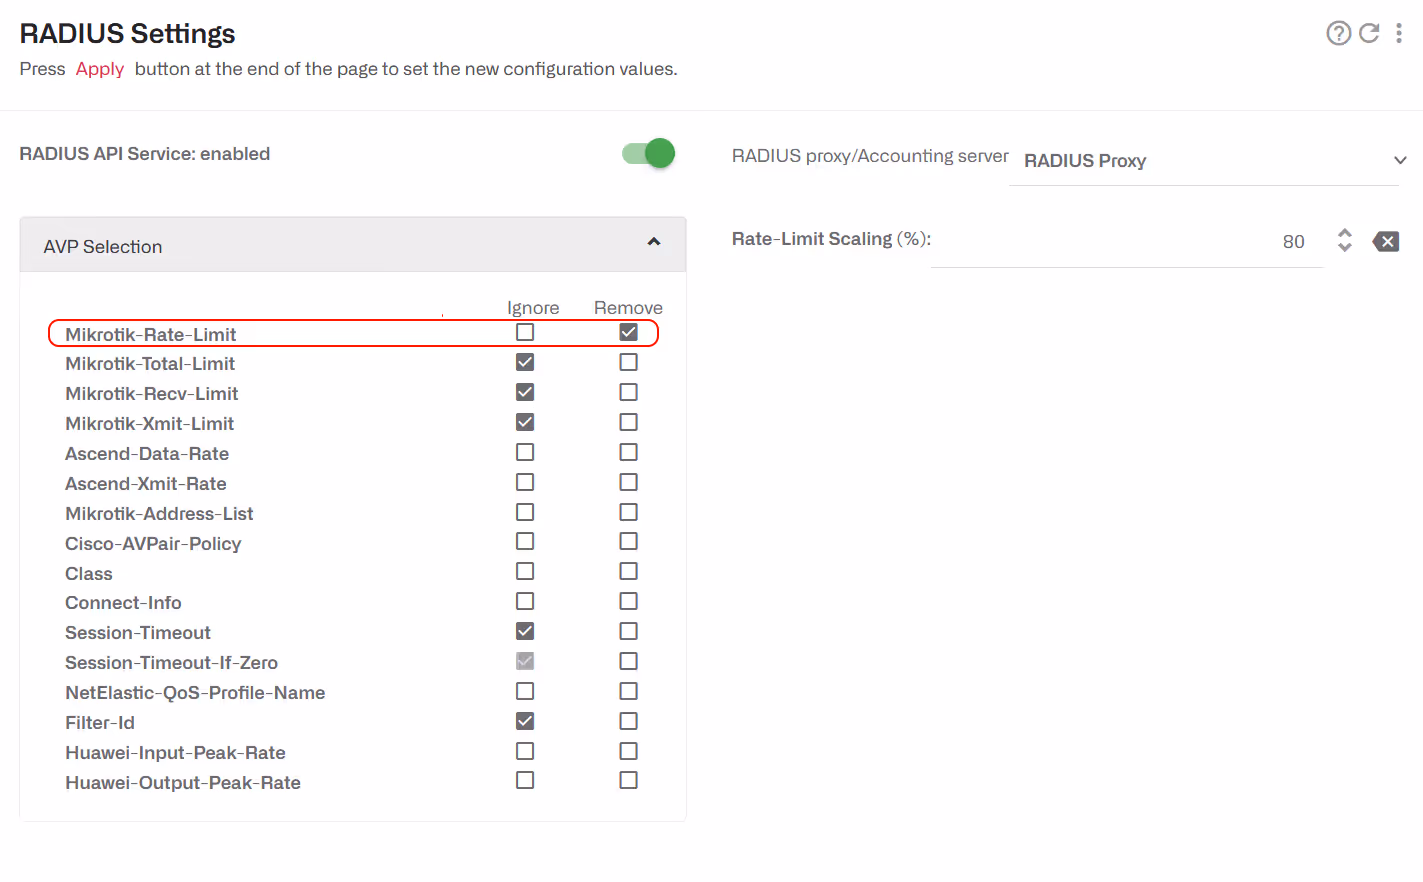
- Make the BQN remove the parameter received from the RADIUS server so the NAS does not receive it (available only in RADIUS proxy deployments using Mikrotik Rate-Limit parameter).
An example of policy limit reduction follows:
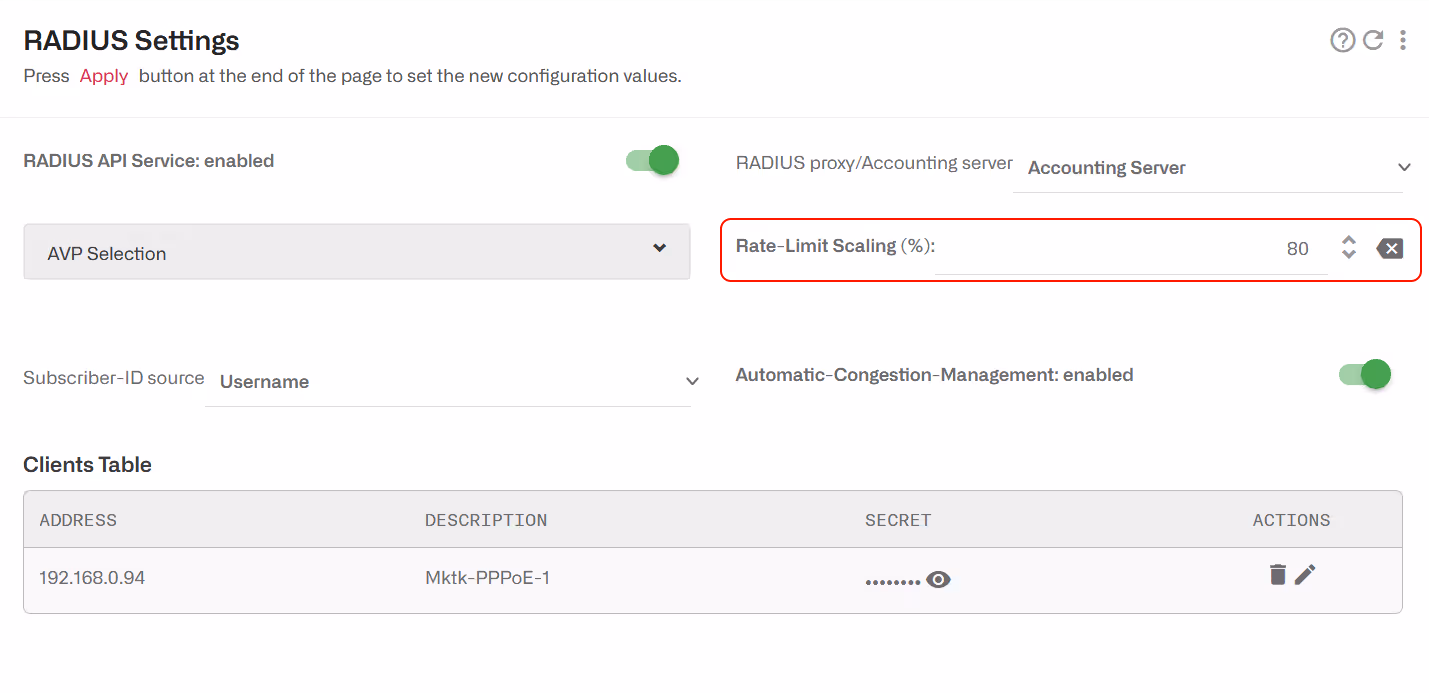
For example, with a percentage of 80%, a 125 Mbps limit in RADIUS will be converted to a 100 Mbps limit in the BQN (125*0.8).
The percentage is applied to all parameters of the subscriber rate policy (rate limit, burst speed and burst threshold).
This parameter can also be set to a higher value (e.g. 200%) to enforce higher rate limits than the current NAS, so that you will get rate policies assigned to subscribers, but the rates will still be controlled by the NAS. This can be useful during initial testing of the RADIUS interface. Also, it is appropriate if you just want the BQN to get the rate policy without enforcing it (for example to use it to select an appropriate flow policy).
To prevent Mikrotik-Rate-Limit from reaching the NAS in proxy deployments:
RADIUS Provides the Rate Policy Name
When a supported RADIUS parameter does not follow the format that allows the BQN to extract the policy definition, the parameter value will be interpreted as the name of one of the subscriber rate policies configured in the BQN.
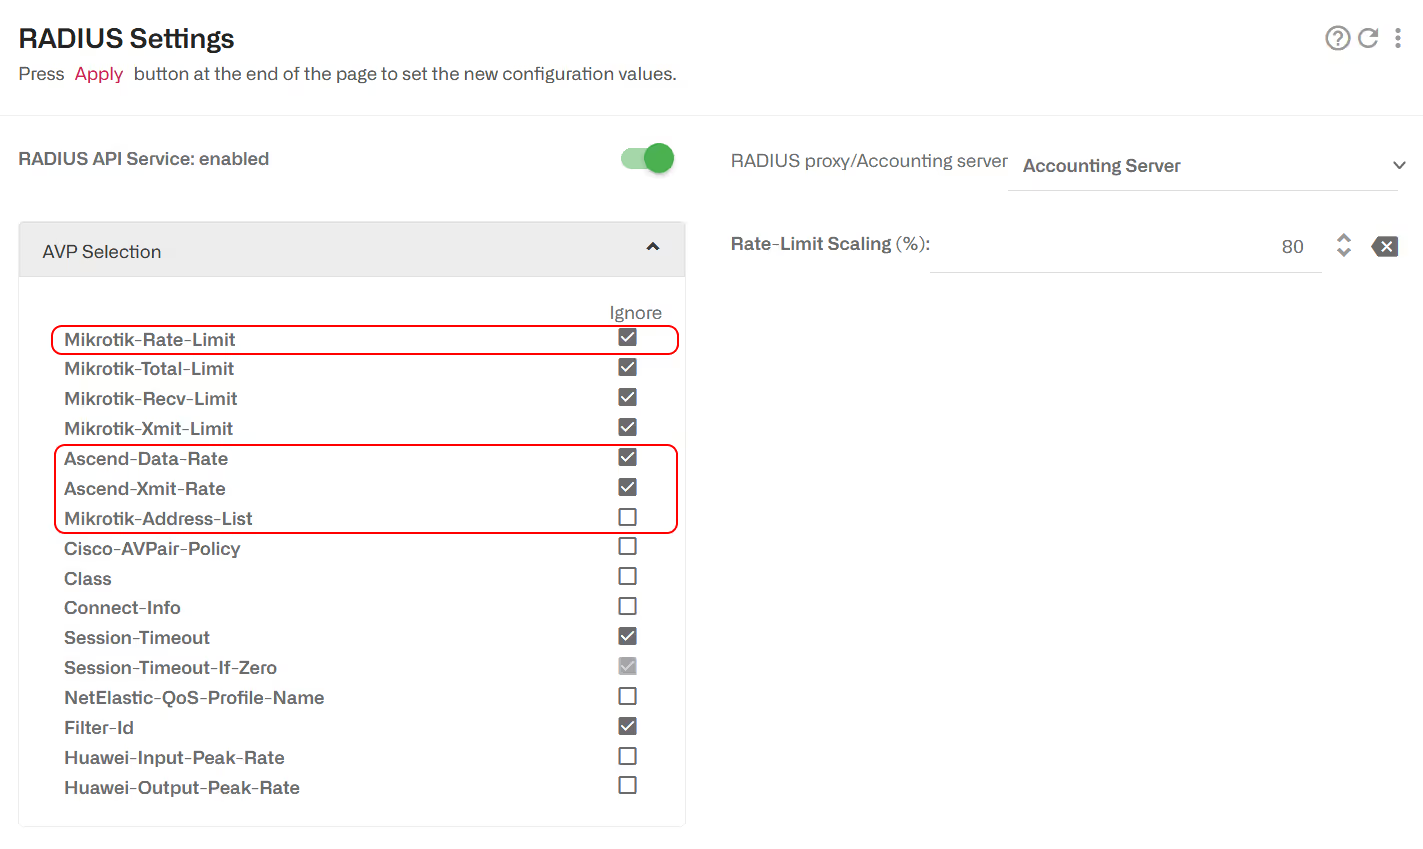
In our example, Mikrotik-Address-List is used, but it is similar with other supported RADIUS parameters.
First, make sure that the parameter is not ignored and that parameters with higher priority are:
The name of the policy configured in the BQN is based on the AVP content, with spaces replaced by underscores (“_”). Those are the names that should be used when configuring the policies in the BQN. With Mikrotik-Address-List, the AVP content “GOLD PLAN” becomes “GOLD_PLAN”.
The policies specified by RADIUS for each subscriber may already be configured in the BQN, in which case they will just be assigned. However, certain policy names specified in Radius may not exist in the BQN yet.
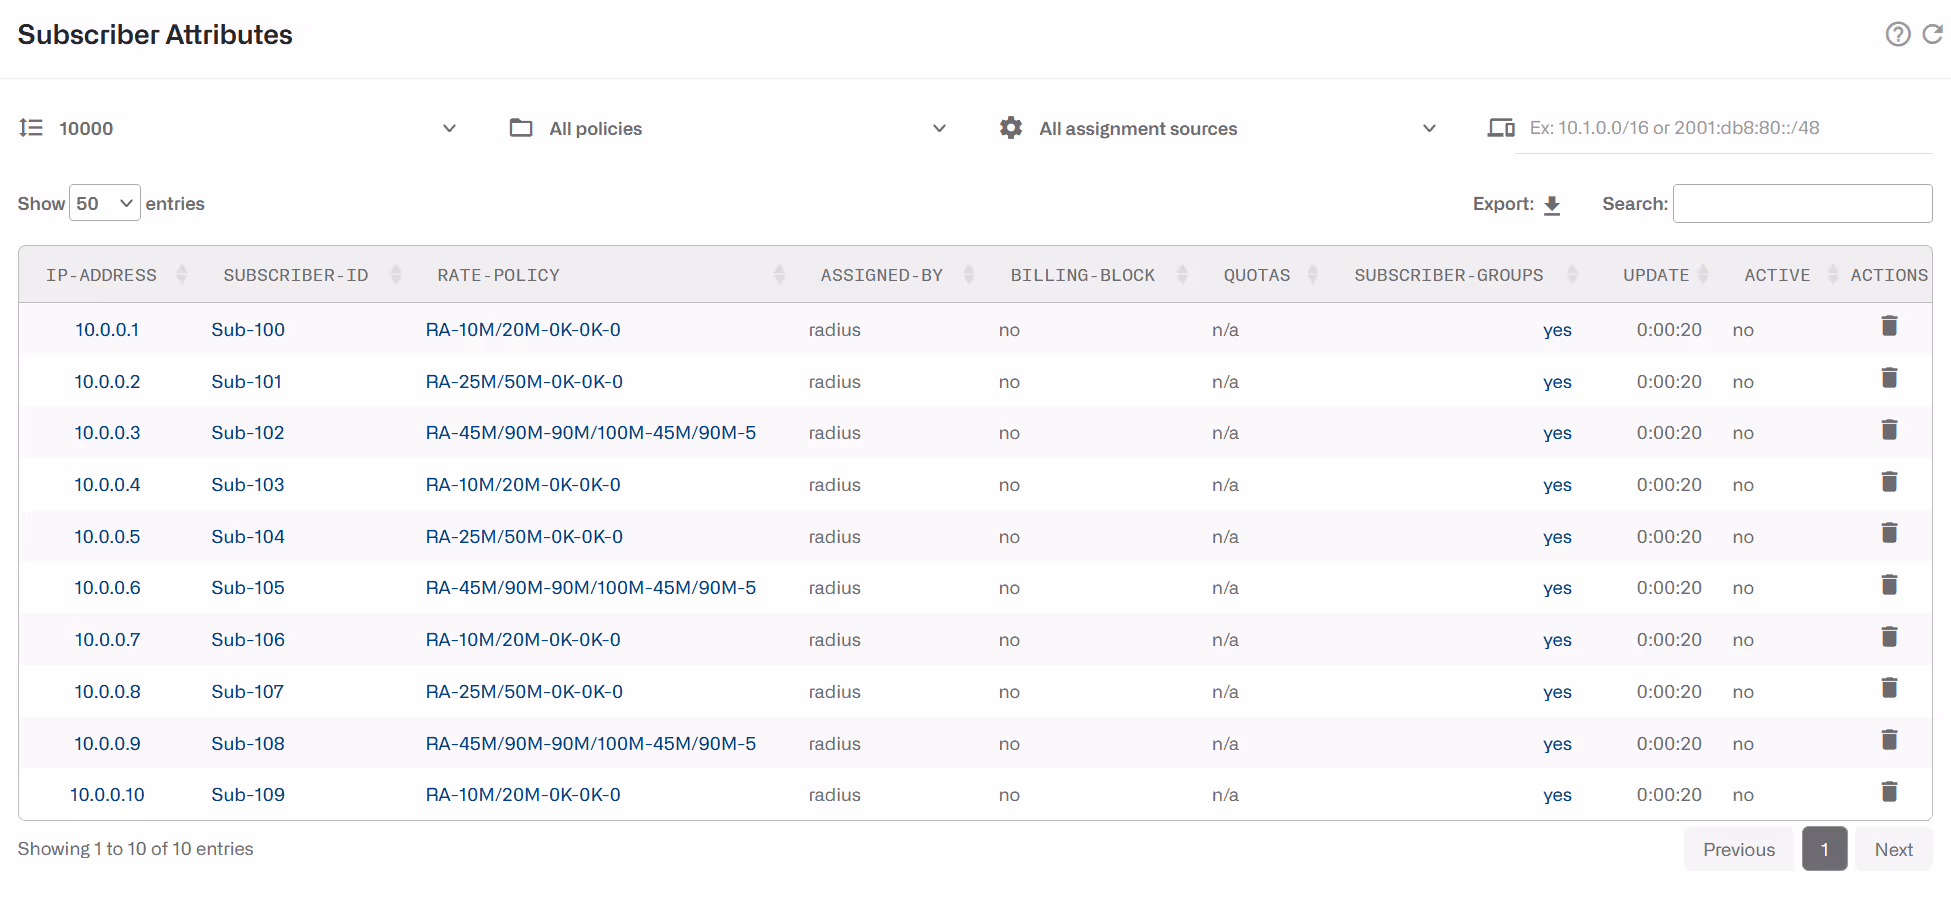
In Status->Subscribers->Subscriber Attributes, subscribers associated to an undefined policy are marked in red in RATE-POLICY column.
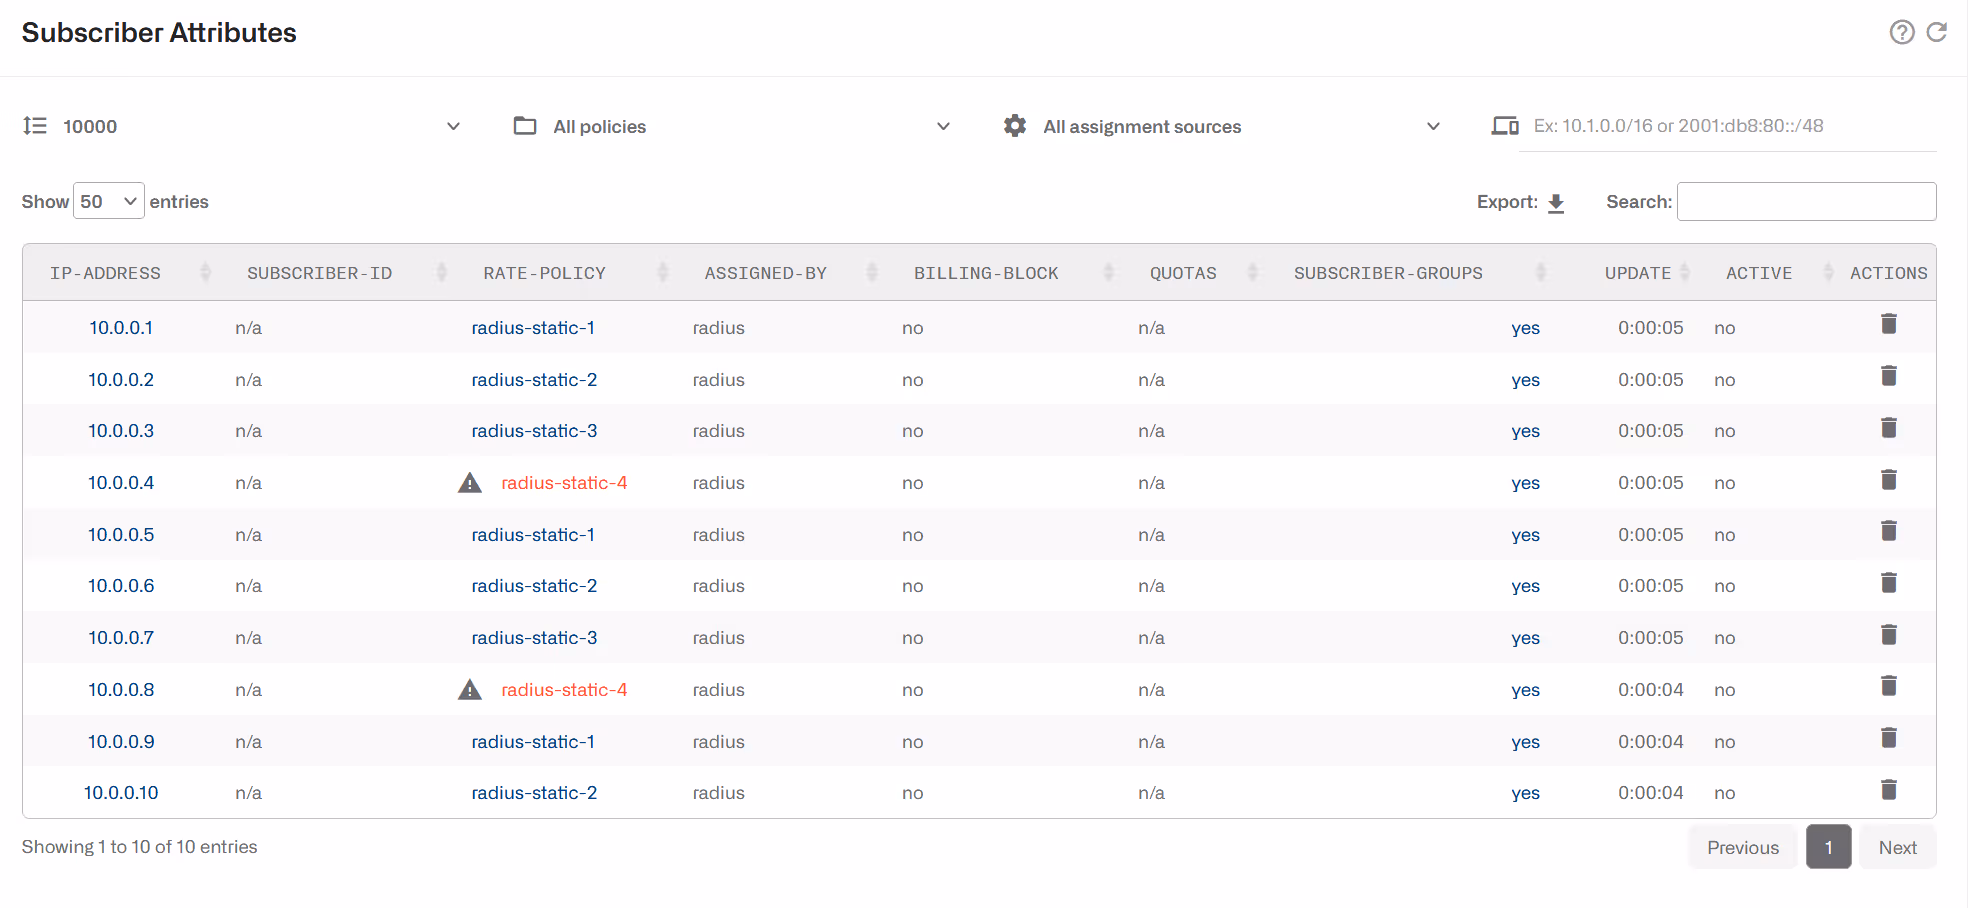
Clicking on the undefined policy name goes to a page to configure it, with the right name already filled in.
The process is repeated for each subscriber rate policy pending configuration.
As RADIUS assignments are received, the SUBS_PROVISIONED counter grows and, as subscriber traffic is received, the “SUBS-ACTIVE” counter will increase.
To go to the list of subscribers associated to a subscriber rate policy via RADIUS, go to Status->Subscribers->Subscriber Attributes.
Checking the Status of RADIUS Rate Policies
Status->Subscribers->Subscriber Attributes shows a table with all subscribers where you can see the assigned rate policy (RATE-POLICY column) and if coming from RADIUS (ASSIGNED-BY showing radius).
Status->Policies->Rate Policies shows a table with all rate policies. Those created from RADIUS will have a “no” in CONFIGURED column. SUBS-PROVISIONED indicates how many subscribers are associated to this policy and SUBS-ACTIVE how many of them are currently active(with traffic).
IPv4/IPv6 Dual Stack
In a network with dual stack, it is possible to apply the rate policy speed limits jointly to the IPv4 and IPv6 addresses of the same subscriber. By jointly we mean that the combined traffic of the IPv4 and IPv6 addresses cannot exceed the limit defined by the rate policy.
The IPv4 address is obtained from the Framed-IP-Address AVP and the IPv6 from the Delegated-IPv6-Prefix or Framed-IPv6-Prefix AVP.
Those AVPs must appear in the RADIUS Accounting Start message or, in proxy deployment, in the Access Accept. Delegated-IPv6-Prefix takes precedence over Framed-IPv6-Prefix: Framed-IPv6-Prefix value is considered only if there is no Delegated-IPv6-Prefix in Access Accept and Accounting Start.
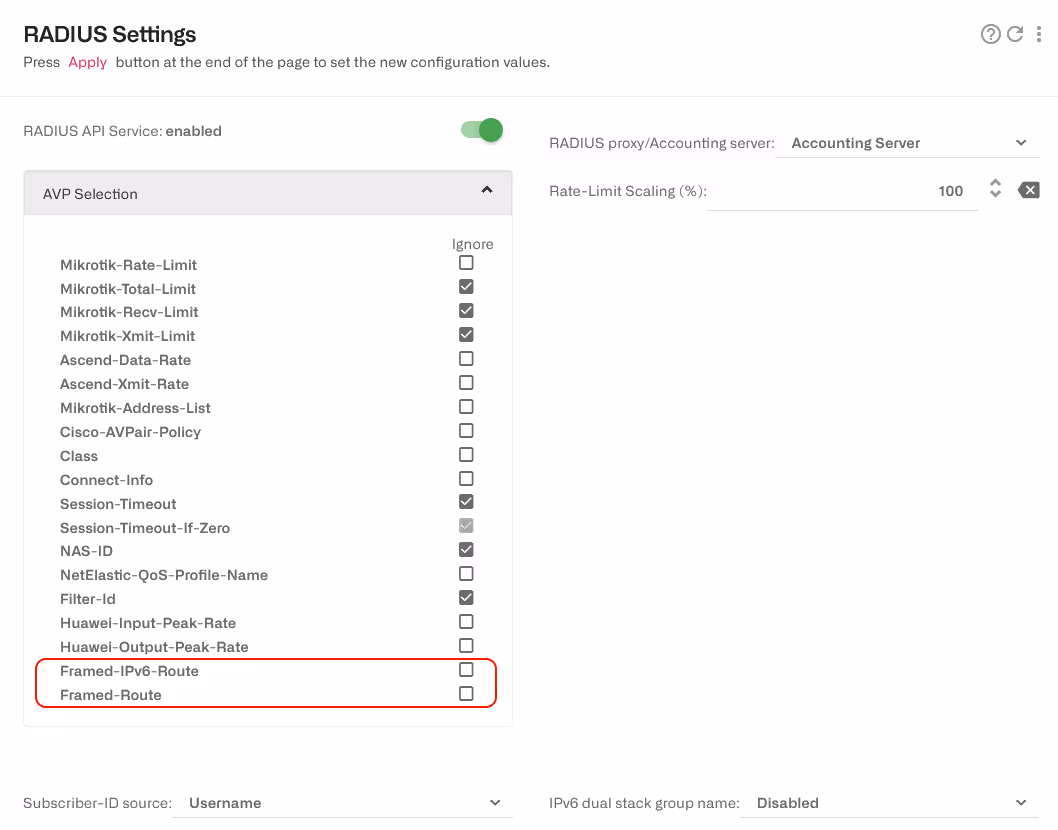
Framed-Route and Framed-IPv6-Route are ignored by default. To consider them in dual stack creation, go to Configuration->RADIUS/REST/Billing->RADIUS and untick the Ignore box in the AVP Selection.
Dual stack is disabled by default. To enable it, choose an option in IPv6 dual stack group name:

This will create one subscriber group per subscriber withdual stack with the IPv4 and IPv6 addresses and members and the rate policy associated with the group. In the example, groups will be named using the RADIUS AVP Calling-Station-Id. Groups created to implement dual stack have a DS- prefix and will be of type dual-stack.
If there is only Framed-IP-Address and Framed-Route (no IPv6), a dual stack group will be created to associate the IPv4 address and range.
Time and Volume Quota management
Time and Volume quotas are received from the RADIUS server Access Accept mesage and associated to the subscriber IP address received in the Framed-IP-Address field.
RADIUS proxy deployment must be used for quota management.
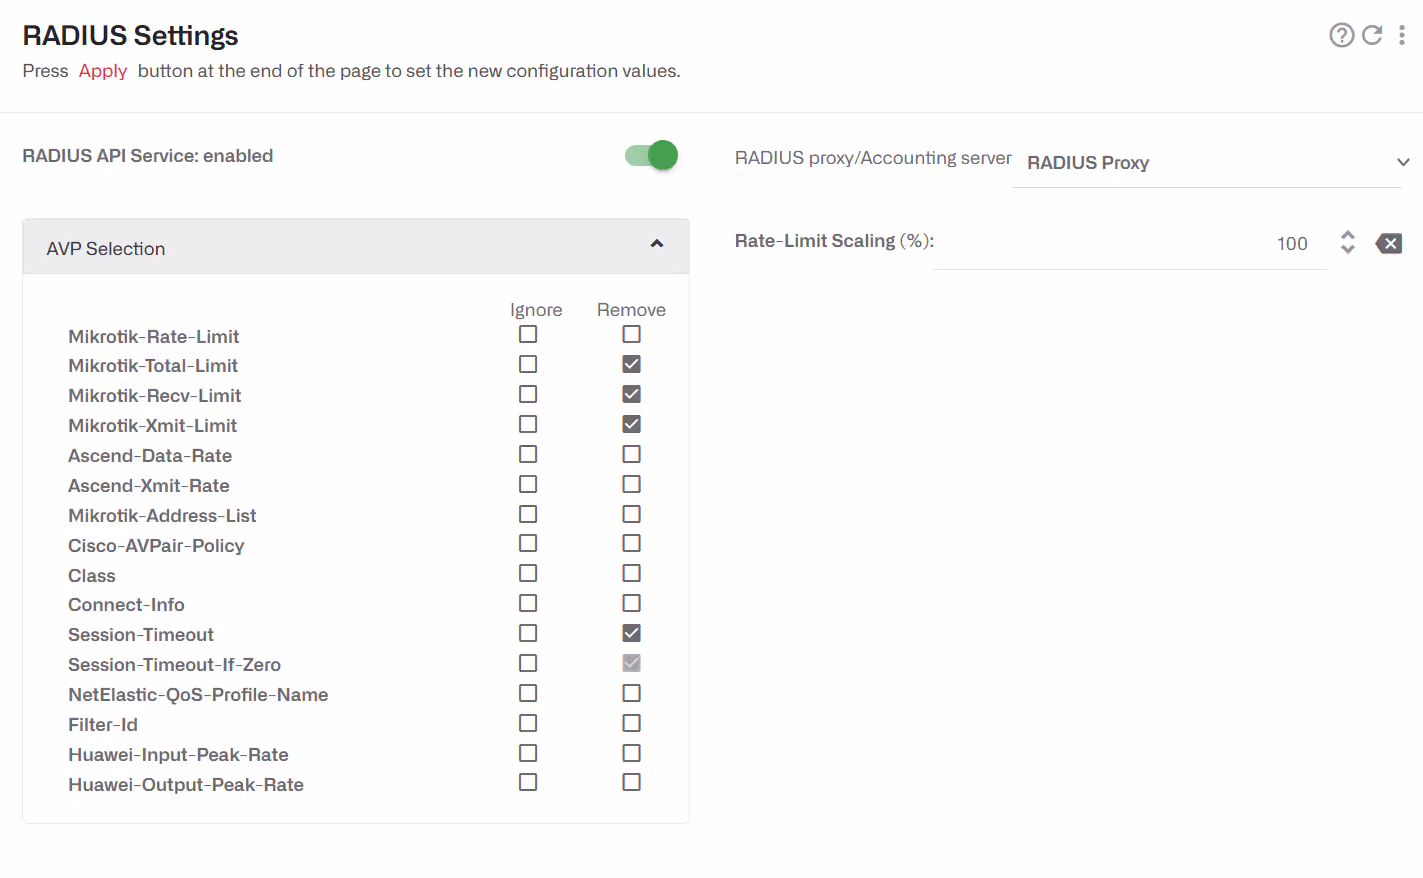
A table with the RADIUS AVPs supported for Quota management follows (received in AccesssAccept from the RADIUS Server). They are ignored by default, so uncheck the ignore tick box to configure the BQN to use them:
The BQN reports usage in its accounting interim requests, using the following RADIUS parameters:
Note that uplink and downlink traffic are reported combined using the same pair of AVPs.
Because BQN is in proxy mode, its volume counting will drive volume quota enforcement. For example, it is possible to configure BQN rules based on the subscriber ID or group (see Subscriber Identification section) so some applications are excluded from the count.
In most cases it is important that the quota is enforced by the BQN alone. To achieve this, configure BQN so that quota-related AVPs are removed from both Access-Accept message relayed to the NAS client and from Accounting-Requests coming from the NAS client.
Some NAS (for example Mikrotik) may send a Session-Timeout value of zero, even when no Session-Timeout has been returned by the Access-Accept message. This will be considered as an exhausted time quota and the subscriber to be blocked. To avoid this, you can set the BQN to ignore a zero value in the Session-Timeout AVP selecting Ignore in Session-Timeout-If-Zero:
Checking the Status of RADIUS Quotas
Status->Subscribers->Subscriber Attributes shows a table with all subscribers where you can see which subscriber have a Quota (QUOTA column with enabled). Clicking on enabled will lead you to the quota details.
Status->Subscribers->Subscriber Quotas shows a table with all the quota details. It will tell you if the quota is exhausted (QUOTA-BLOCK yes), the quota time limit, the quota volume limit in GB and how much of the volume quota has been consumed.
Subscriber Identification (Subscriber ID)
RADIUS information can be the source of subscriber identification information.
Both accounting server and proxy deployments can be used for subscriber identification.
The BQN keeps a subscriber ID to track subscriber across IP address changes. The source of this ID can be taken from RADIUS. The list of supported RADIUS parameters are:
In Configuration->RADIUS/REST/Billling->RADIUS, go to the field Subscriber-ID source and select the appropriate value (Leave unchanged by default).
To check the subscriber ID information, go to Status->Subscribers->Subscriber Attributes and see SUBSCRIBER-ID column.
Subscriber Group
You can assign subscribers to subscriber groups based on RADIUS information. You can see metrics broken down per subscriber groups or define policy rules that treat those groups differently (for example, make a subscribers in a group with a service not accounted as part of those subscribers volume quotas.
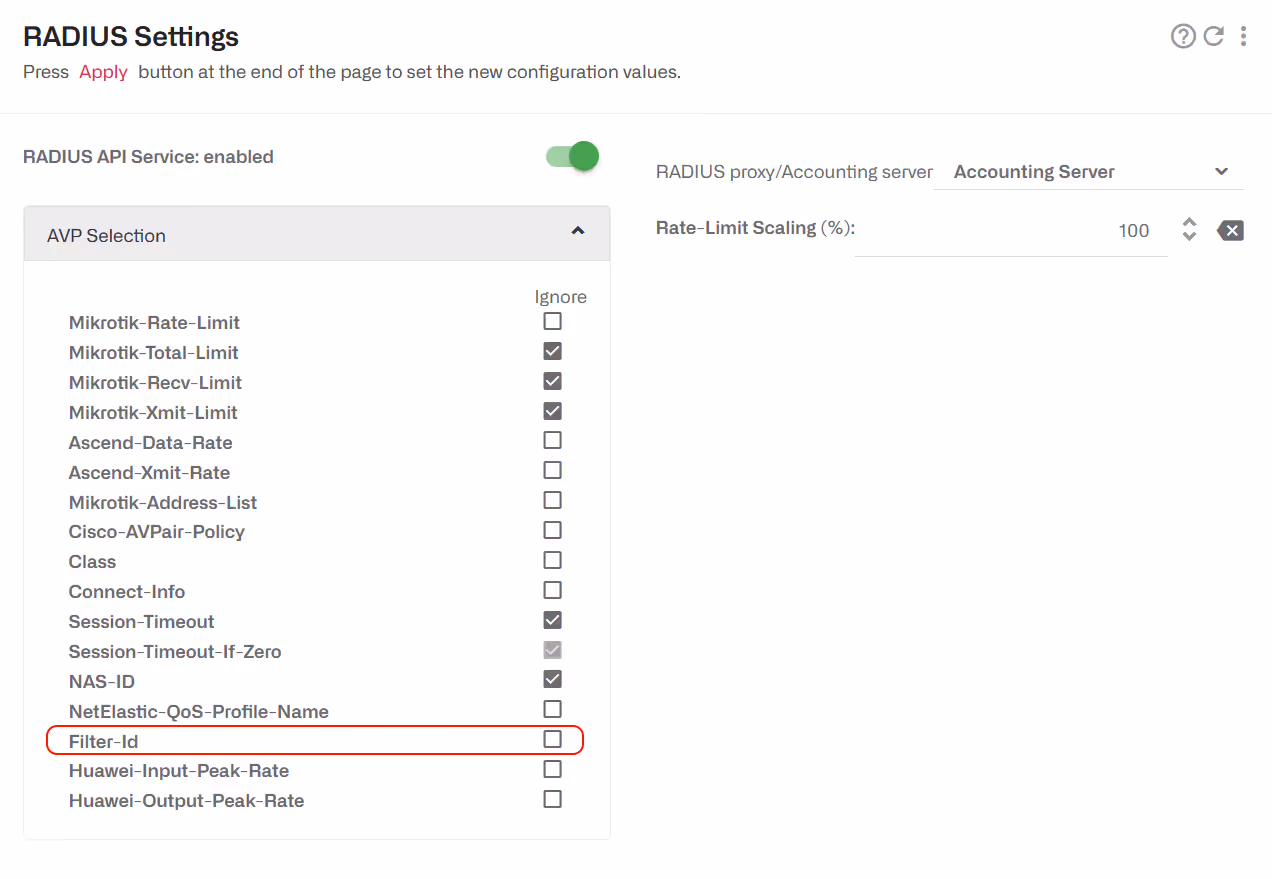
The RADIUS parameters that can be source of subscriber groups are listed in the following table:
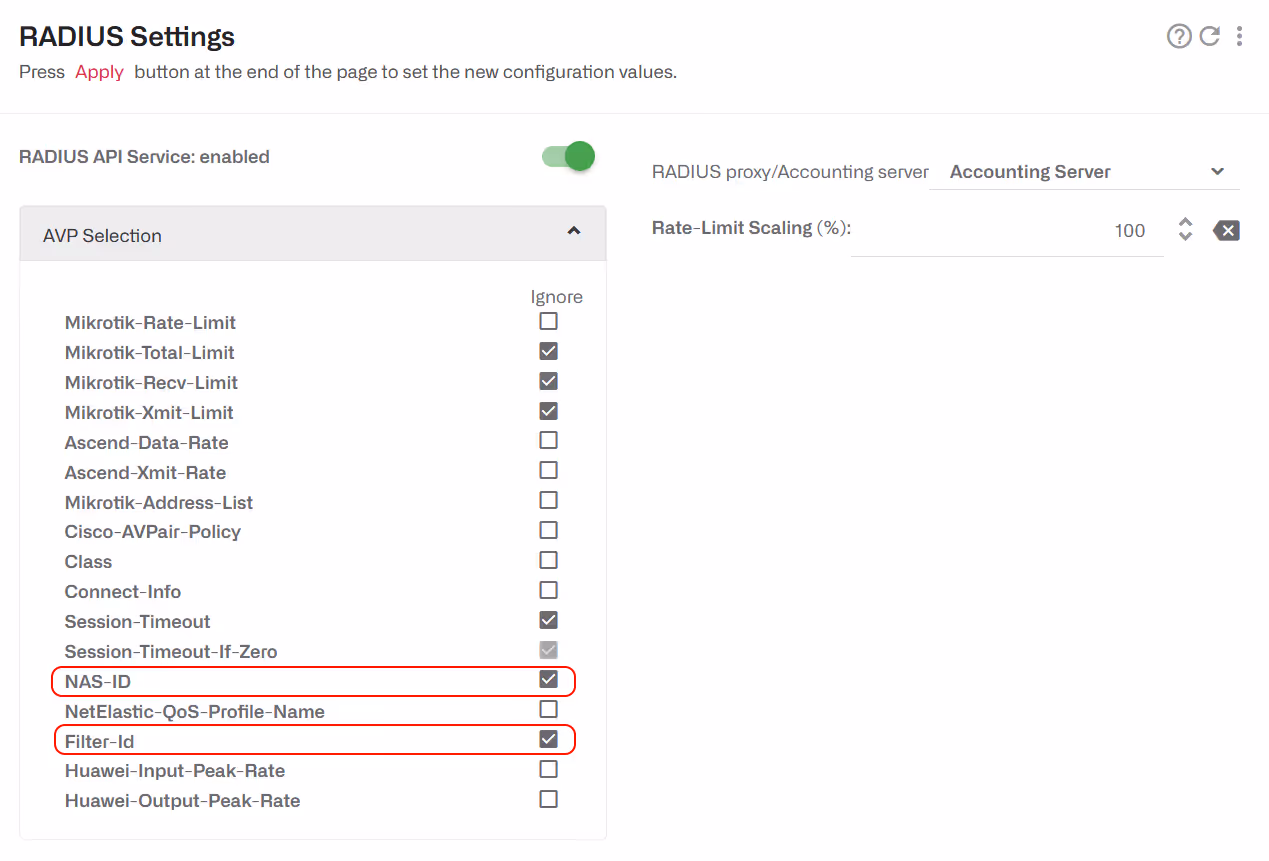
They are ignored by default, so uncheck the ignore tick box to configure the BQN to use them, as shown in next screen for the Filter-Id AVP:
Once enabled, subscribers will be added to a group named after their Filter-Id value. If RADIUS sends several instances of Filter-Id AVP, the subscriber will be added to more than one group, one for each Filter-Id value, to a maximum of 8 groups.
To check the subscriber group information, go to Status->Subscribers->Subscriber Attributes and see SUBSCRIBER-GROUPS column.
Status->Subscribers->Subscriber Groups will show the list of subscriber groups and the number of subscribers assigned (provisioned) and the number of them active.
If you don’t want subscribers to be grouped using RADIUS, set all the related AVPs to be ignored:
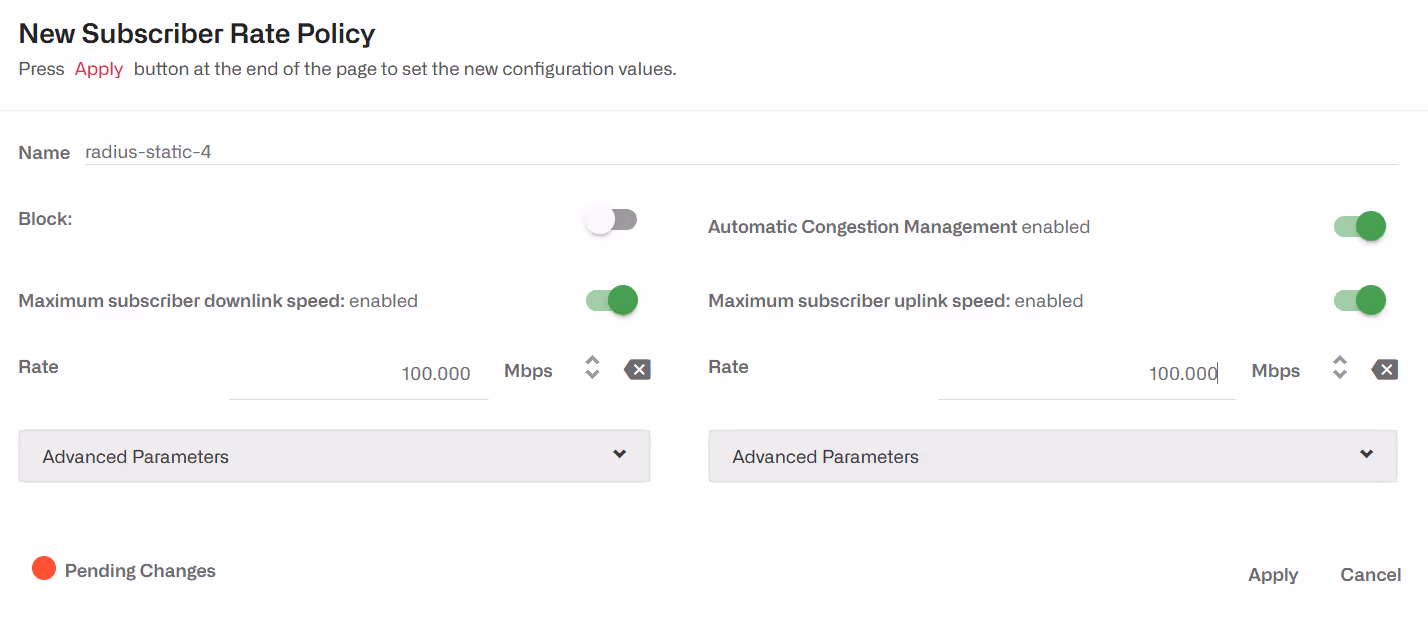
Enable/Disable ACM Optimization
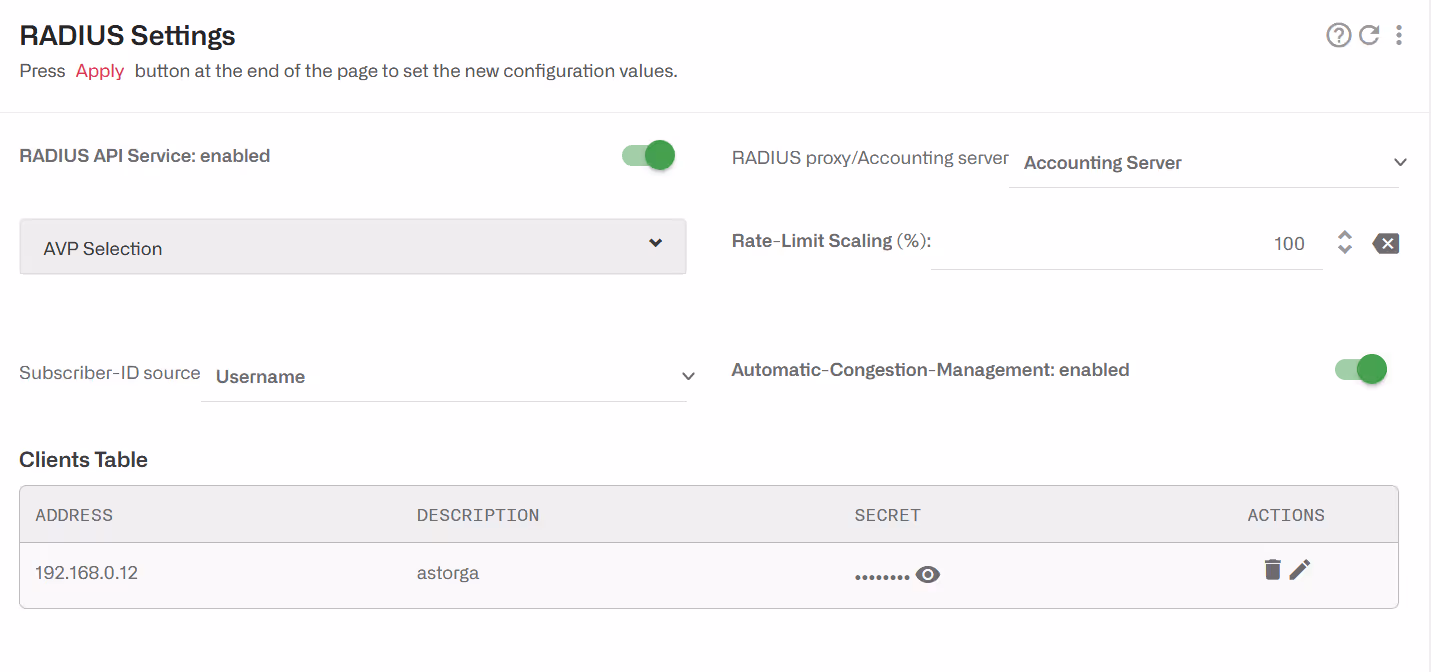
ACM is enabled by default for all RADIUS dynamic policies. To enable or disable ACM, change the “Automatic Congestion Management" field in the configuration of the RADIUS/REST/Billing->RADIUS:
Lorem ipsum dolor sit amet, consectetur adipiscing elit. Suspendisse varius enim in eros elementum tristique. Duis cursus, mi quis viverra ornare, eros dolor interdum nulla, ut commodo diam libero vitae erat. Aenean faucibus nibh et justo cursus id rutrum lorem imperdiet. Nunc ut sem vitae risus tristique posuere.
Lorem ipsum dolor sit amet, consectetur adipiscing elit. Suspendisse varius enim in eros elementum tristique. Duis cursus, mi quis viverra ornare, eros dolor interdum nulla, ut commodo diam libero vitae erat. Aenean faucibus nibh et justo cursus id rutrum lorem imperdiet. Nunc ut sem vitae risus tristique posuere.
Lorem ipsum dolor sit amet, consectetur adipiscing elit. Suspendisse varius enim in eros elementum tristique. Duis cursus, mi quis viverra ornare, eros dolor interdum nulla, ut commodo diam libero vitae erat. Aenean faucibus nibh et justo cursus id rutrum lorem imperdiet. Nunc ut sem vitae risus tristique posuere.